Bitbucket sync setup guide
Bitbucket is a Git-based source code repository hosting service popular among teams using Atlassian tools.
You can use the Tokens Studio plugin native integration with Bitbucket to sync your Design Tokens to a repository of your choice.
We support two-way sync, meaning you can use the plugin to:
- Push JSON files of Design Tokens to Bitbucket
- Pull the Tokens stored in Bitbucket into any Figma file
This means the Design Tokens living in code are the source of truth for our design decisions, which can be shared between design and development teams.
This doc outlines how to set up a Bitbucket repository and add it as a Sync provider in the plugin.
→ Once set up, you can use the plugin's Push and Pull features to keep your Tokens in sync.
How it works
- Set up a repository and personal access Token in Bitbucket.
- Configure Bitbucket as a sync provider within the Tokens Studio plugin.
- Use the plugin to sync your Design Tokens between Bitbucket and Figma design files.
Bitbucket setup instructions
If you haven't already, sign up for a Bitbucket account at https://bitbucket.org/
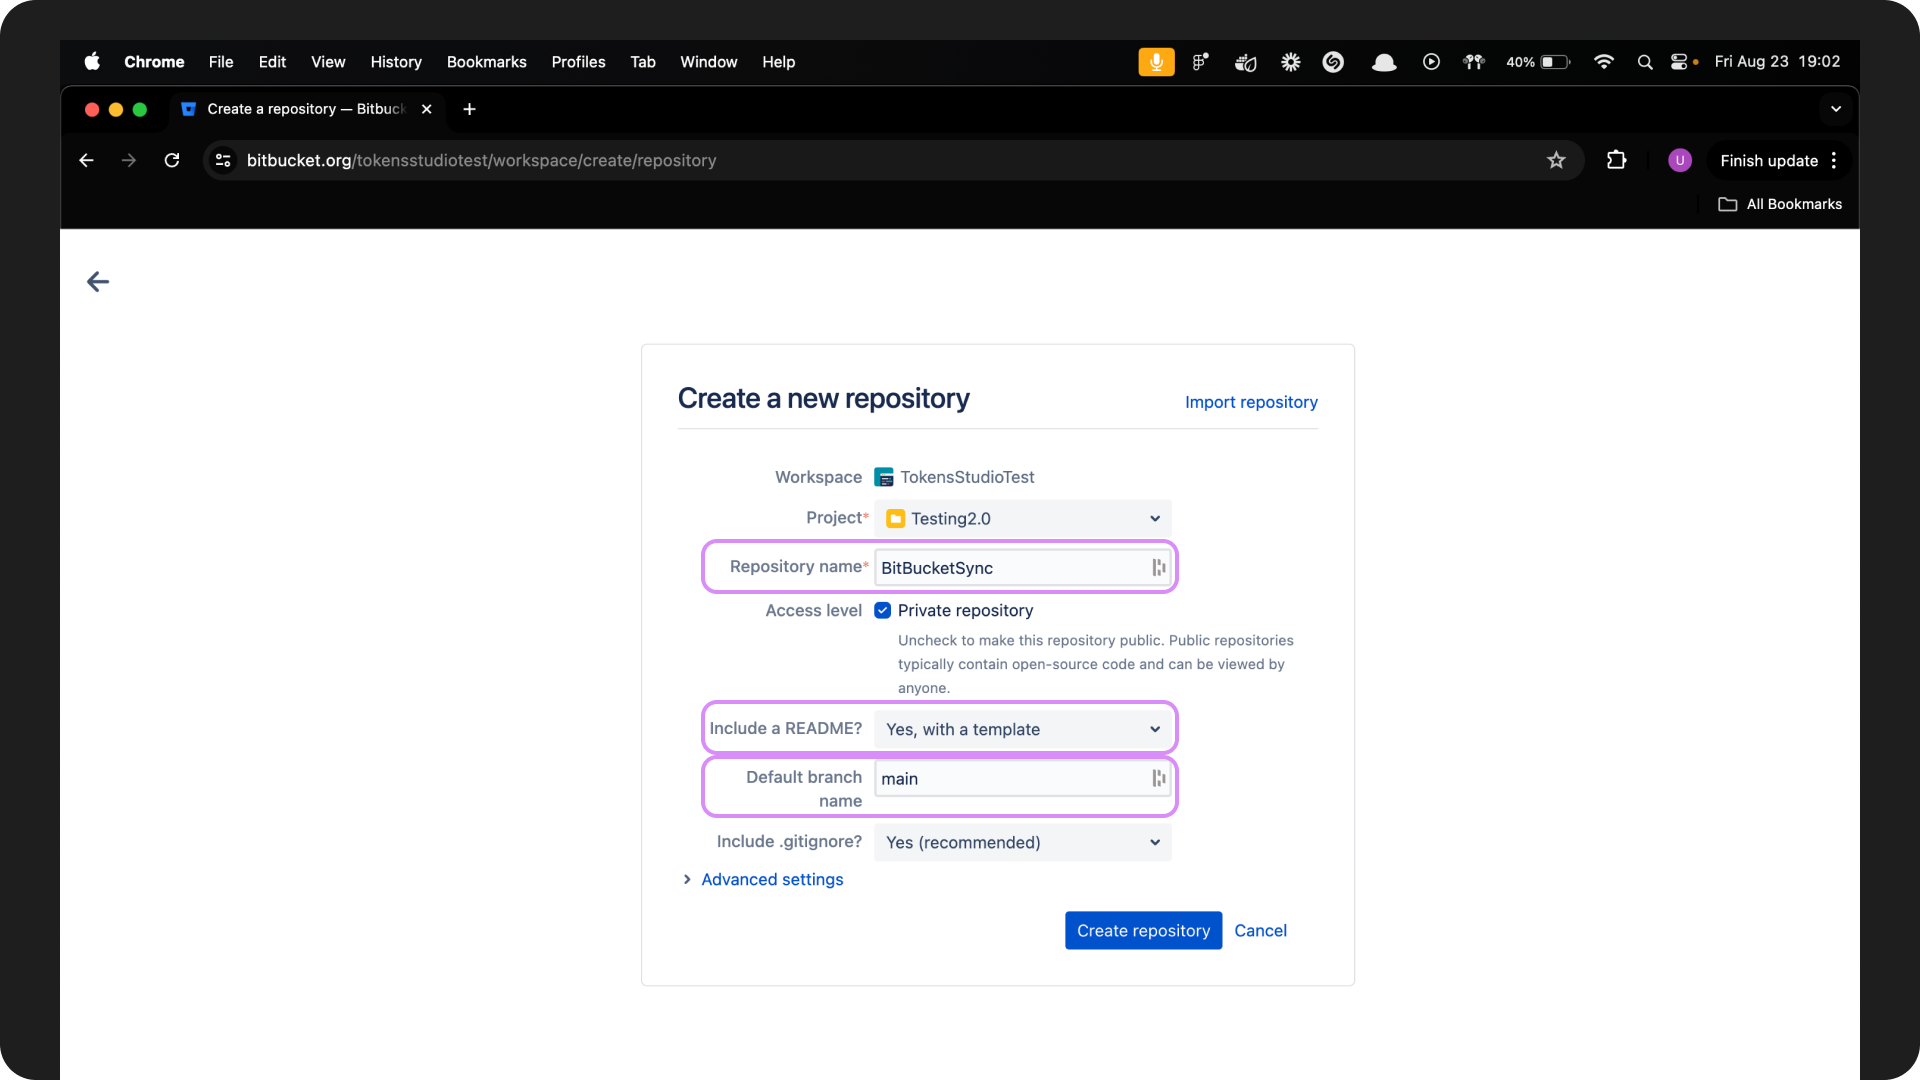
1. Create a new repository
Sign into your account and select the Create button, and select Repository.
- Select the project the repository should belong to.
- Choose a specific and memorable repository name which will be used in the plugin as the destination for your Design Tokens.
- Review the options, learn more about those in the Bitbucket docs.
Add a README fileneeds to be checked- This is mandatory because the plugin can not sync to an empty repository.
- Enter your default branch name
- We suggest using
mainor ask your engineers what they prefer - Keep a copy of the default branch name handy as you'll need it for the plugin configuration later.
- We suggest using
- Include .gitignore can be None
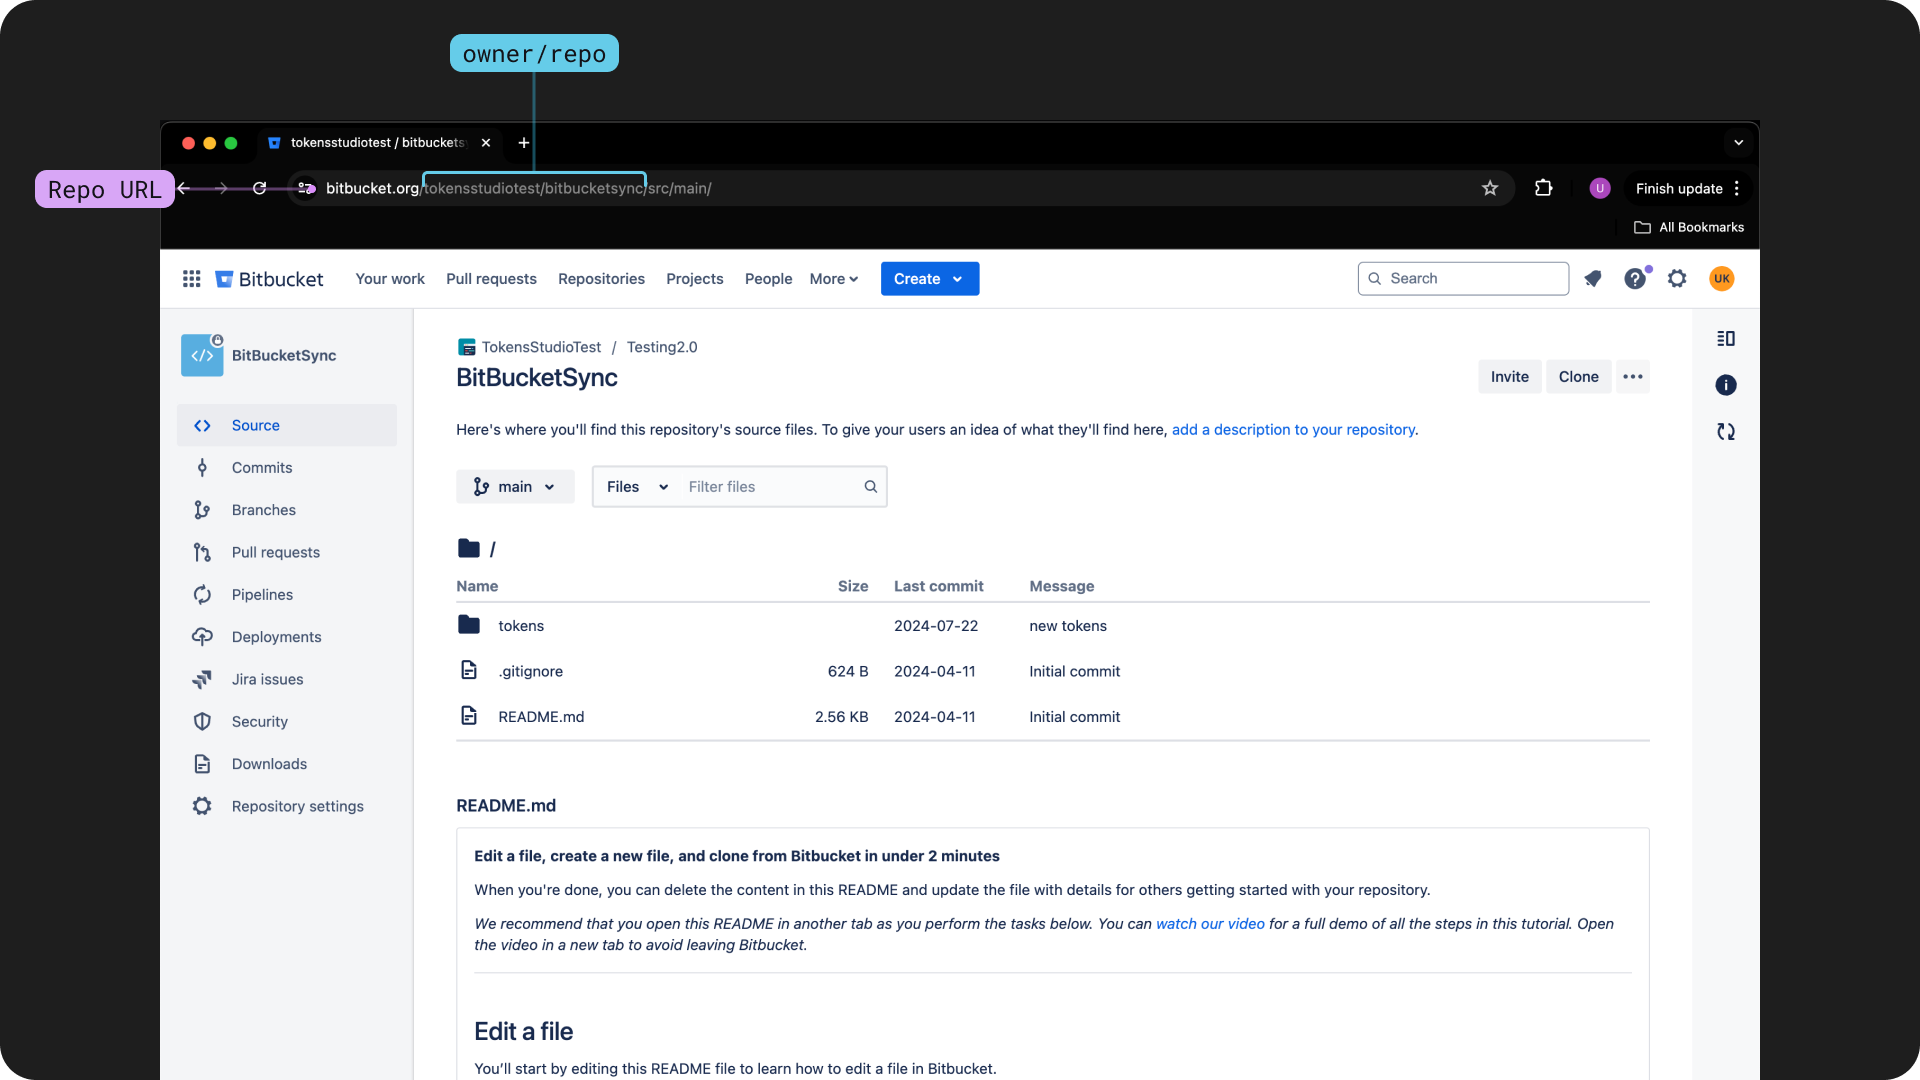
You are now looking at your new repository! Well done!
- Copy the URL of the repository
- Store it somewhere safe as it's needed for the plugin configuration.
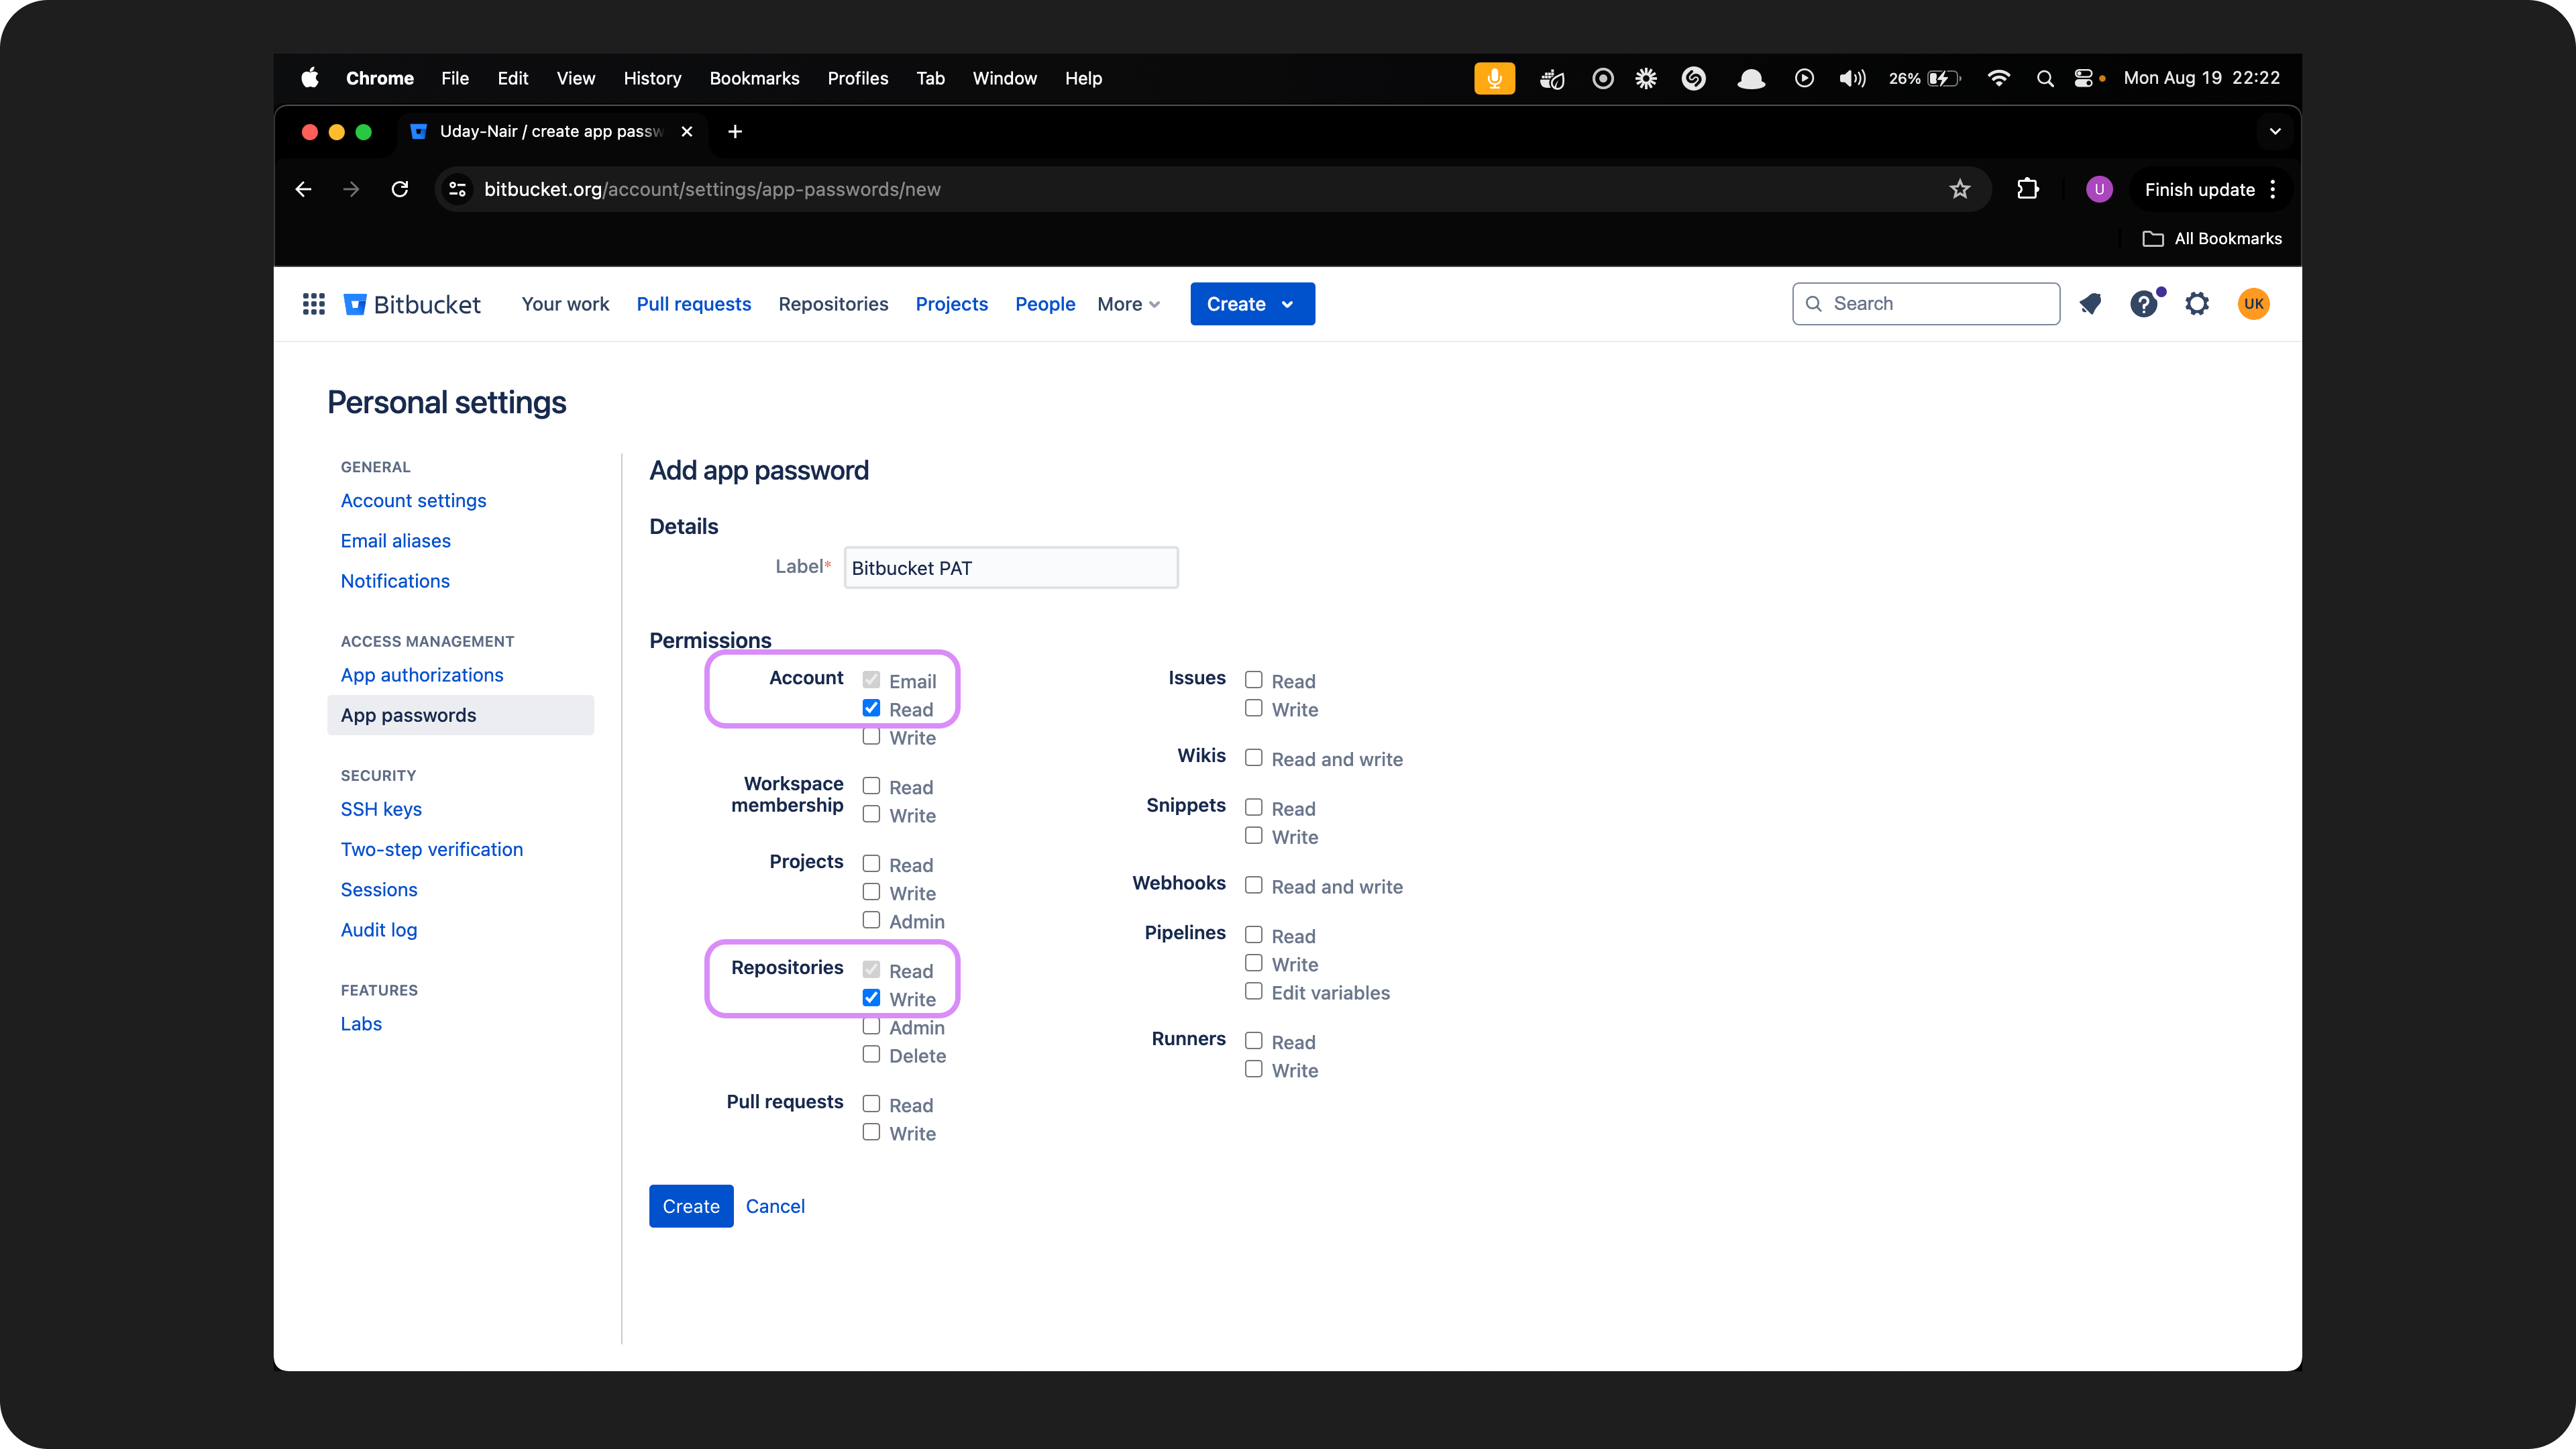
2. Generate an app password
The App password is generated from Bitbucket and acts as a passcode that allows the Tokens Studio plugin to connect to your Bitbucket account.
Navigate to your Bitbucket account settings.
- Locate the Personal settings section, select Personal Bitbucket settings
- Select App passwords.
- Select Create app passwords
- Add a Name of what the app password is for
- Example:
test-token repo sync to Tokens studio
- Example:
- Select the permissions for app passwords
- Account =
Read - Repositories =
Write
- Account =
- Select the Create button
- The page will display the New app password dialog
- Save the generated password, and your Bitbucket username somewhere safe as it's needed for the plugin configuration.
You're ready to configure the Tokens Studio plugin in Figma!
Plugin settings for Bitbucket
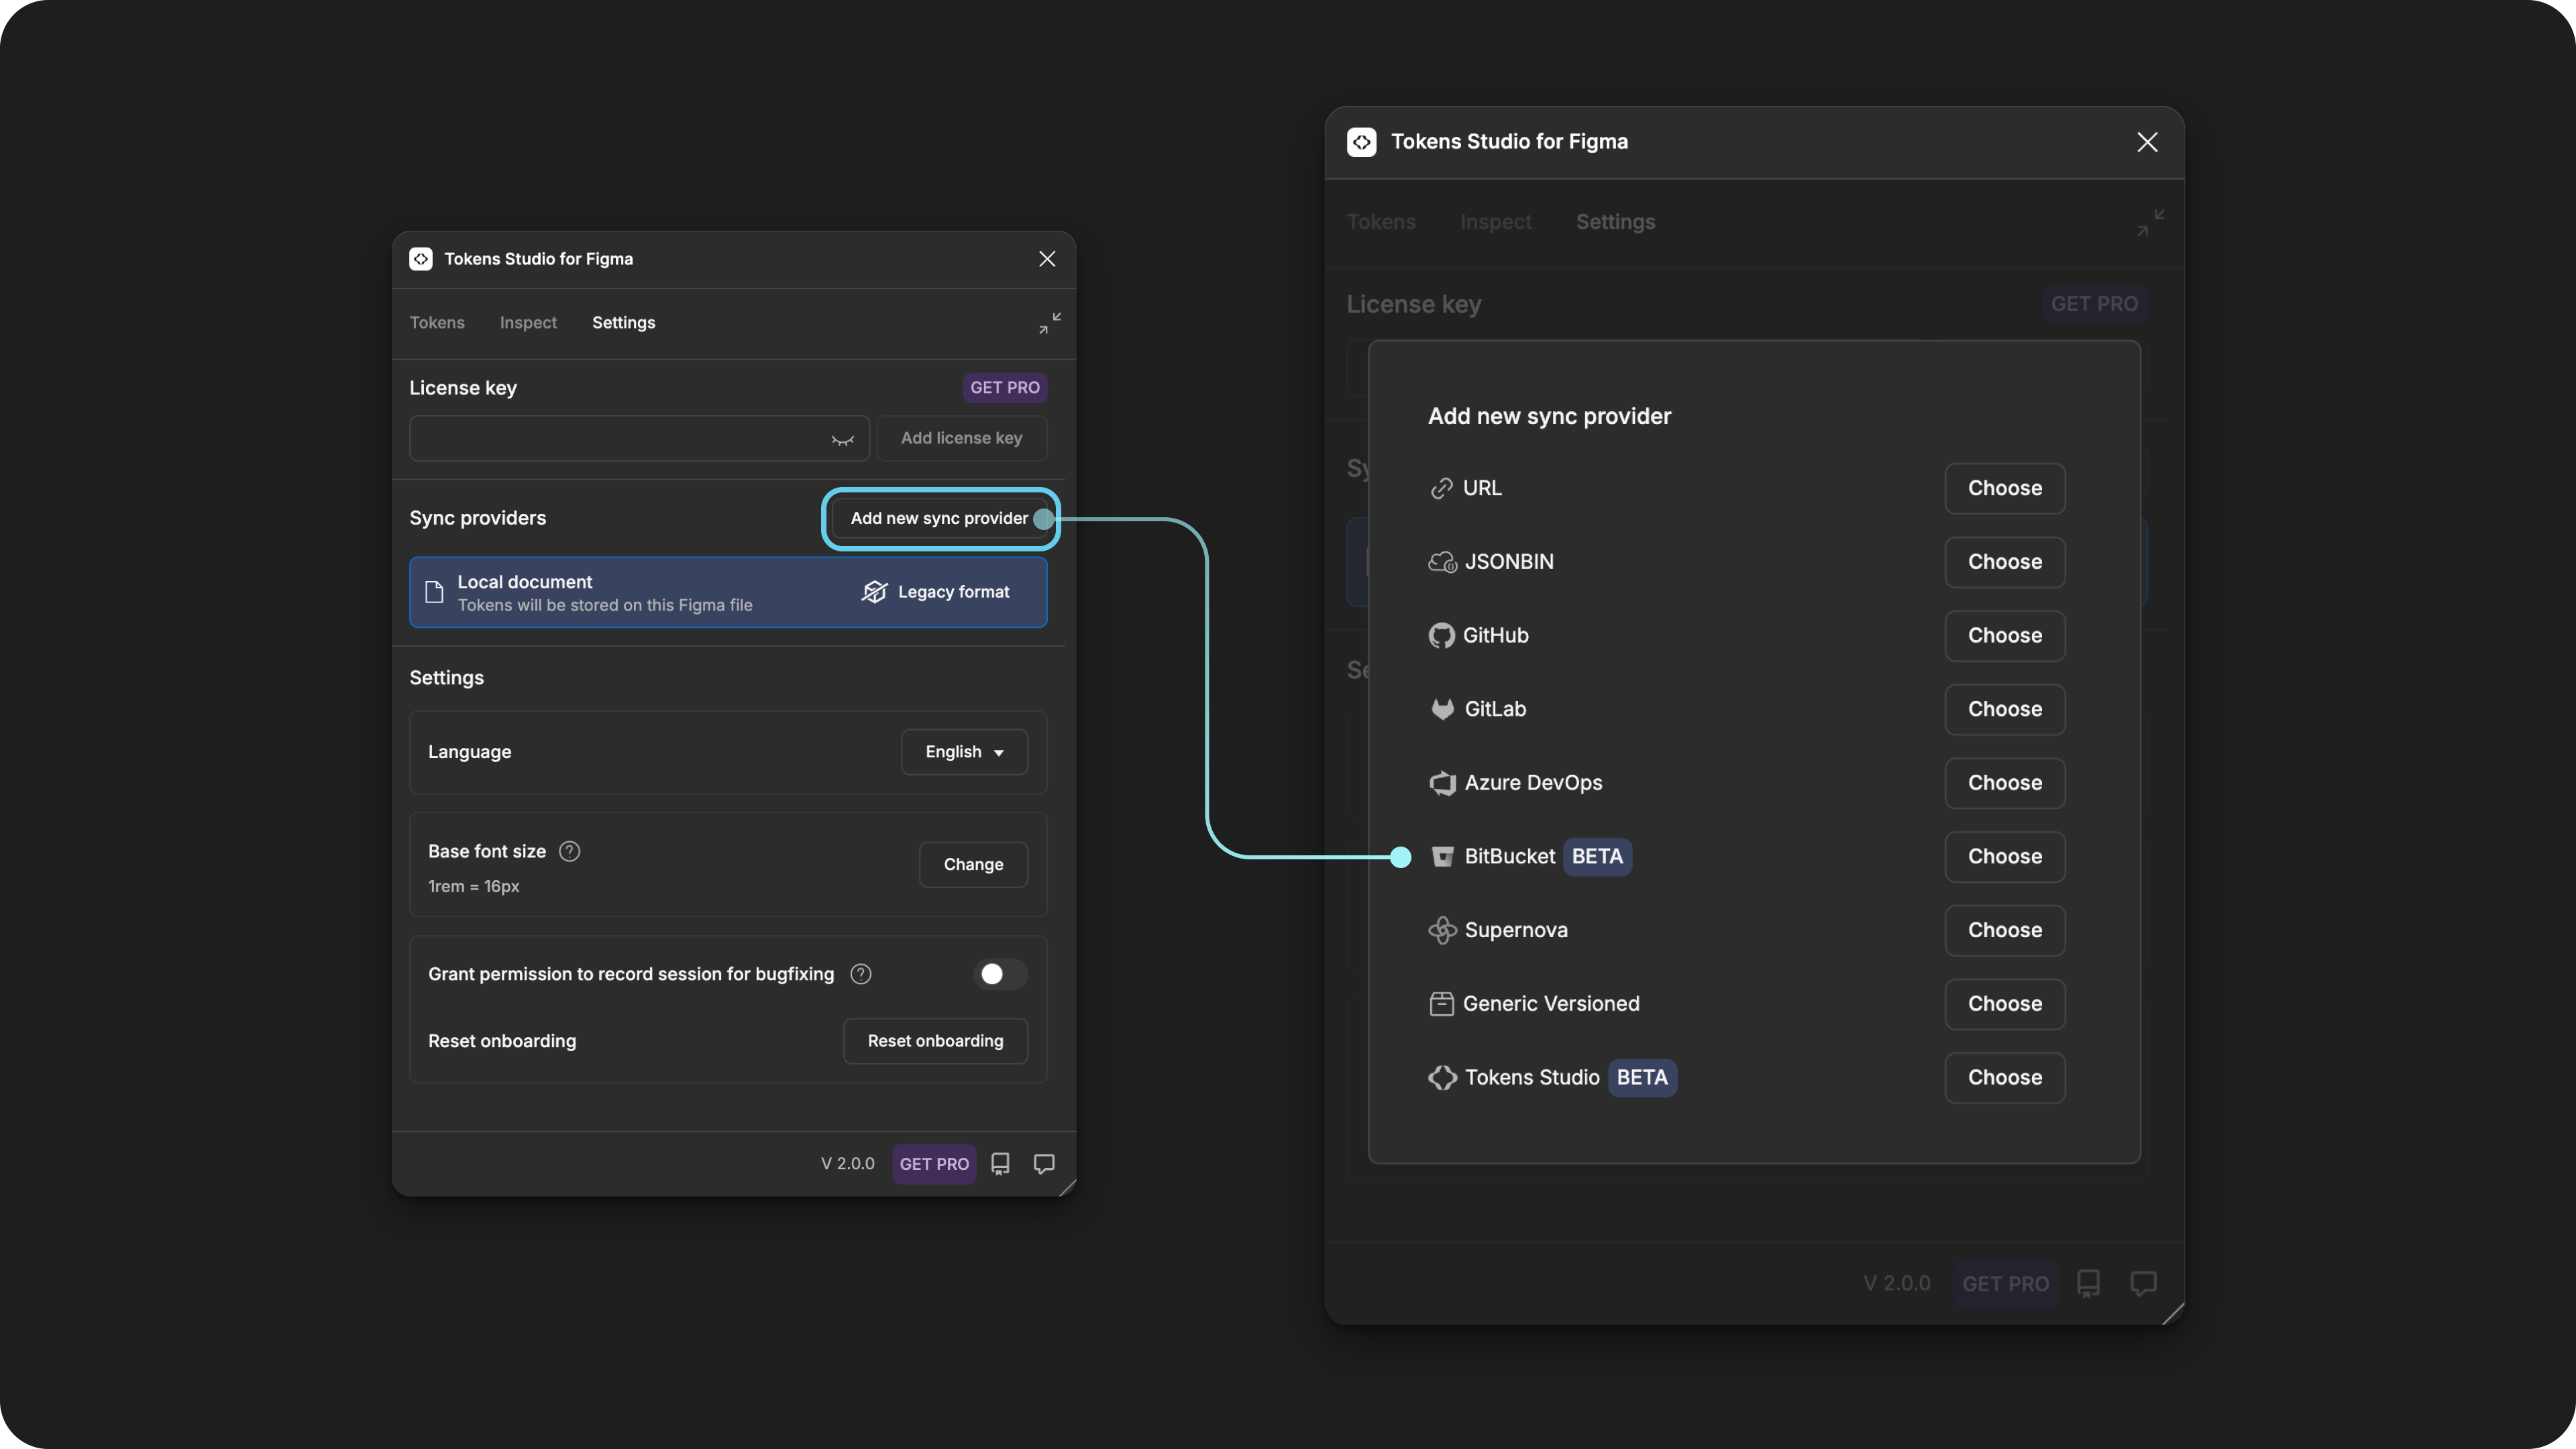
In Figma, open the Tokens Studio plugin and navigate to the Settings page using the navigation tab.
- Under the Sync providers section, select the Add new button to see a list of all Token storage providers.
- Select Bitbucket
Add new credentials for Bitbucket
You'll need the information saved from the steps above to complete the Bitbucket sync configuration form.
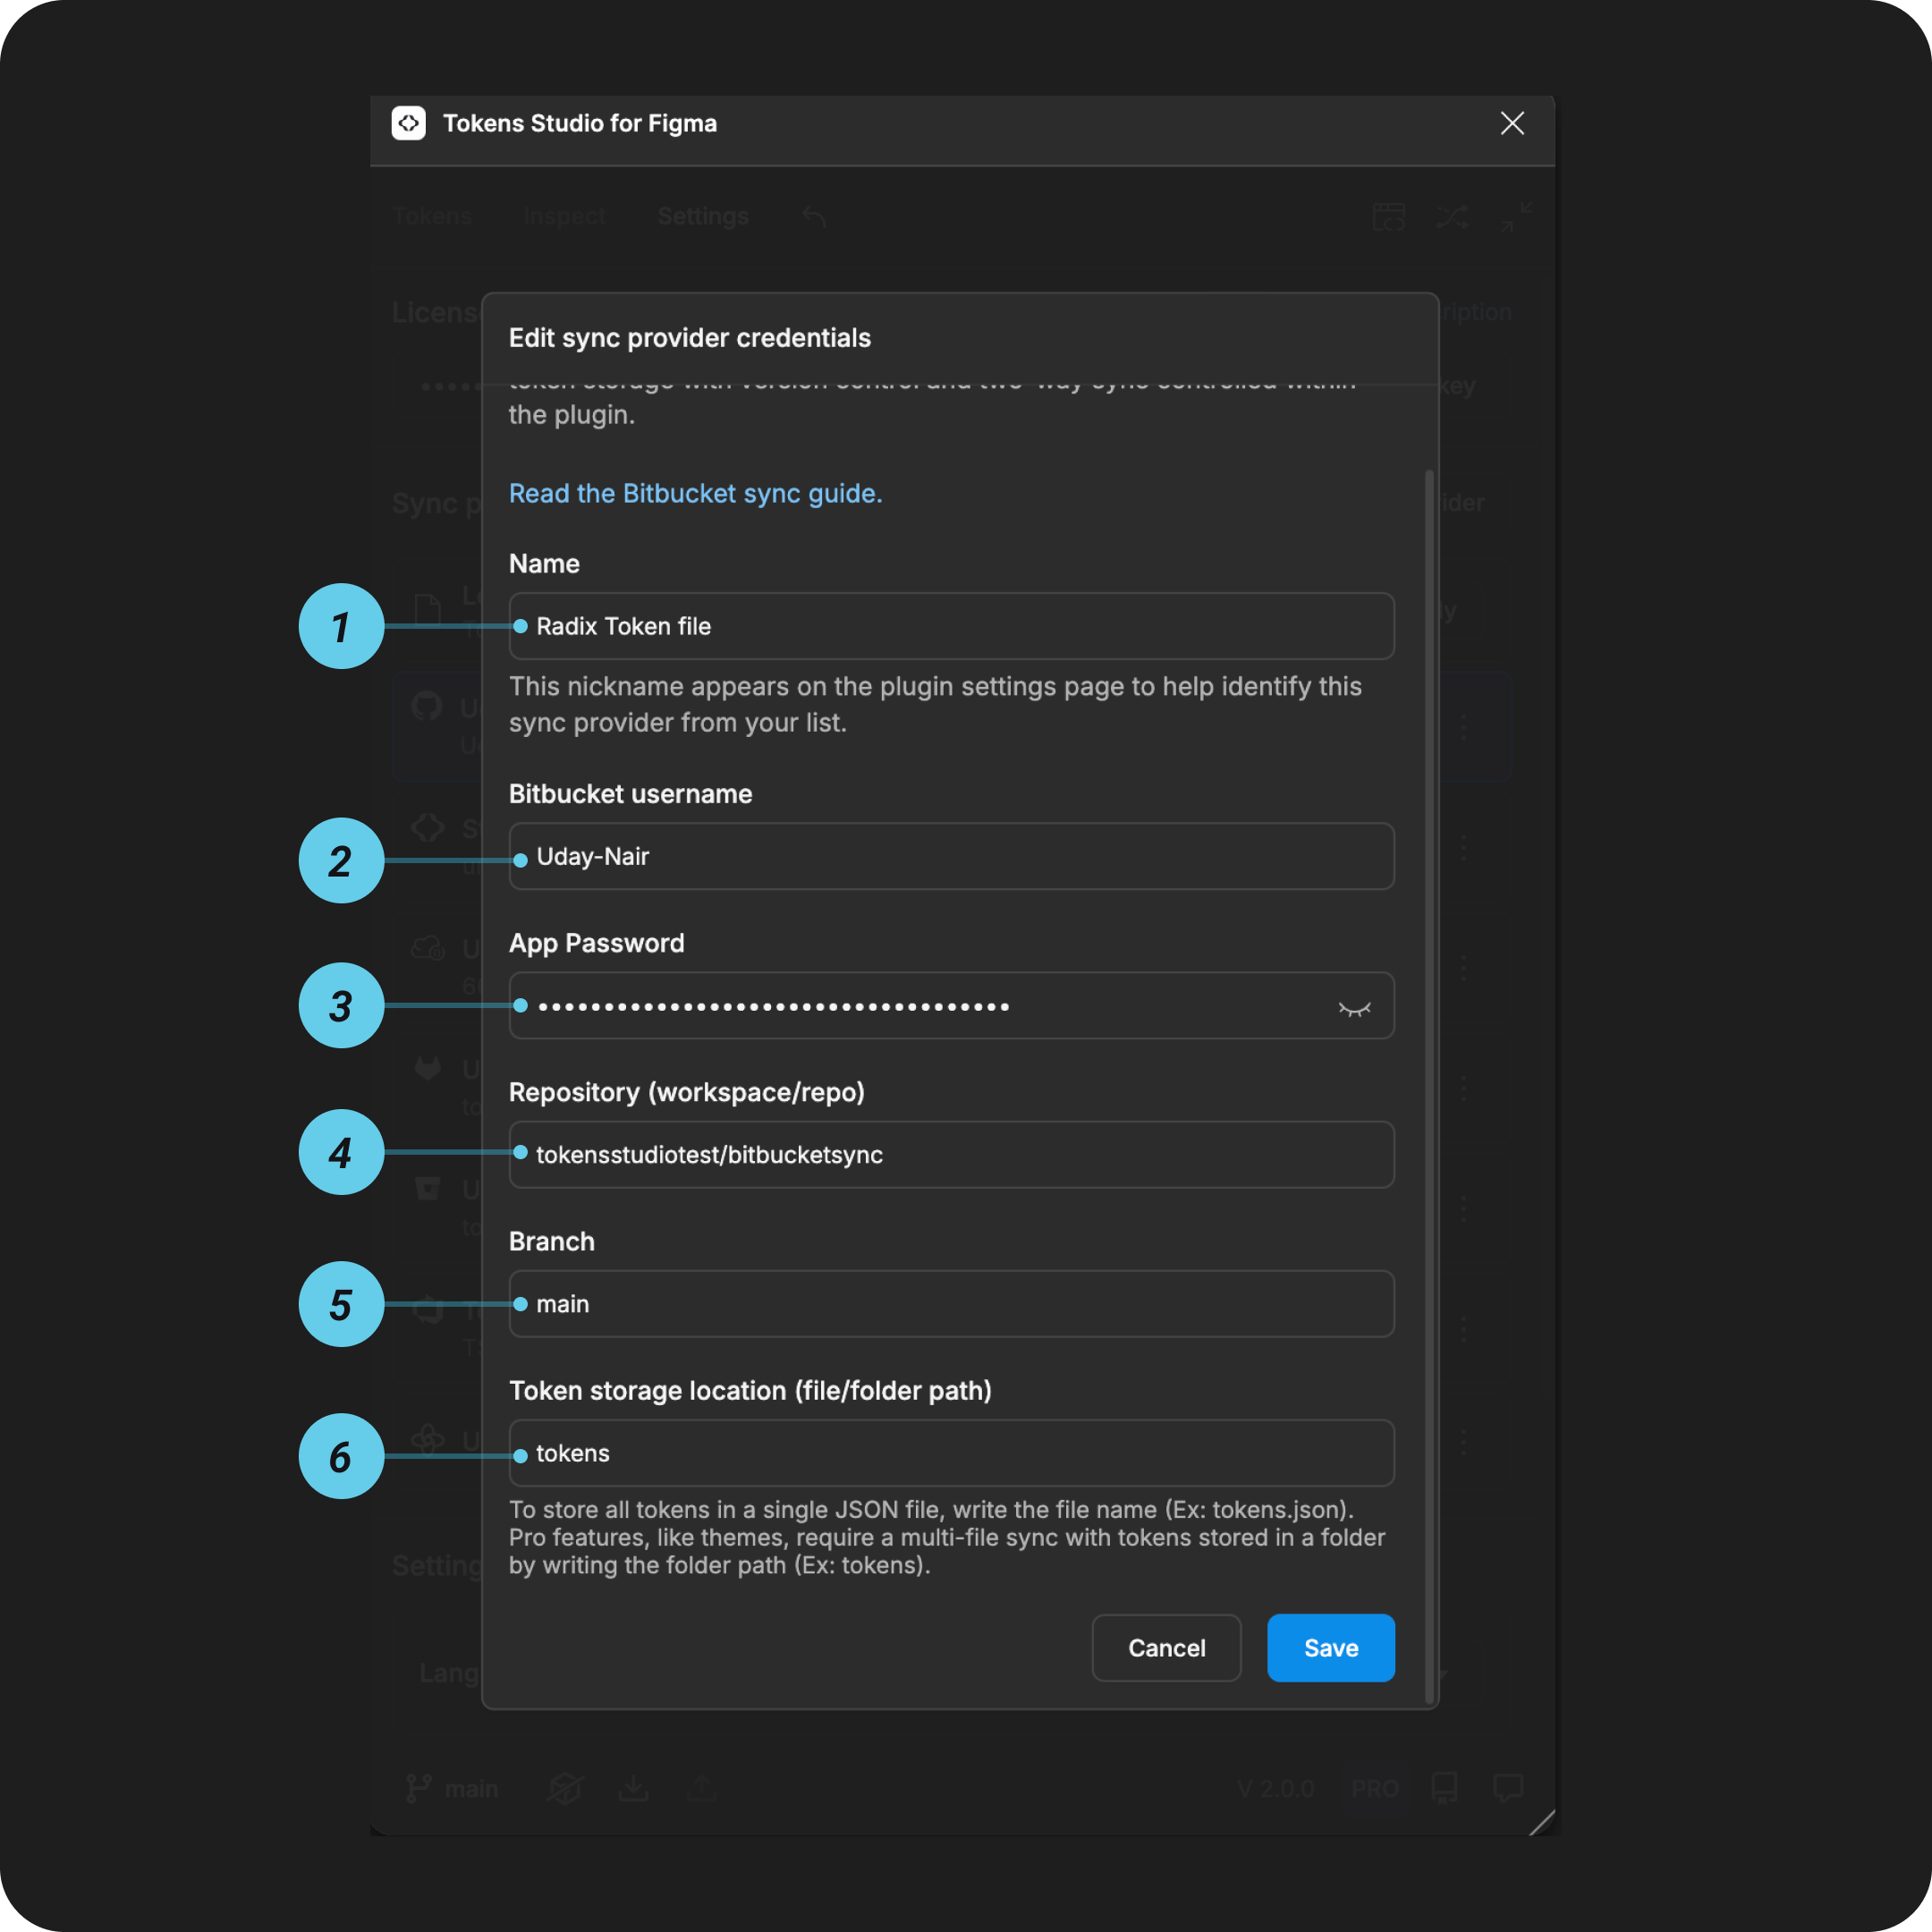
1. Name
This is a nickname that shows up in the Plugin settings page later on to identify this specific sync provider configuration.
- Choose something memorable to you and your project.
- Example:
radix ui components
2. Bitbucket username
The username of your Bitbucket account is used as a part of the authentication process between the plugin and Bitbucket.
3. App password
The App password you saved from the steps above.
4. Repository (owner/repo)
The URL from the repository from the steps above has the owner/repository in it after the bitbucket.org/
Occasionally your URL may contain a project related slug after the owner/repository. The screenshot above shows such a url. If the URL of your repo contains a slug, you'll only need the 2 sections after the bitbucket.org
For example, if your URL says https://butbucket.org/tokensstudiotest/bitnucketsync/src/main you will enter tokensstudiotest/bitbucketsync into the form in the plugin.
5. Branch
Your engineers might tell you what to add as the default repository branch where you will be pushing your Tokens, so if you aren't sure, ask them.
- If you created a new repo following the steps above, you will enter
main. - You can create additional branches using the plugin later.
6. Token storage location (file/folder path)
This tells the plugin:
- How to organize your Token JSON files in Bitbucket.
- In a folder of multiple files, or a single file.
- The location of where your Token data is stored.
- The file or folder's pathway (or name) to sync with.
This setting impacts
- How engineers can work with our Token files during the Token transformation stage of the design-to-development process.
- May limit edit access of Tokens for other team members using the Tokens Studio plugin.
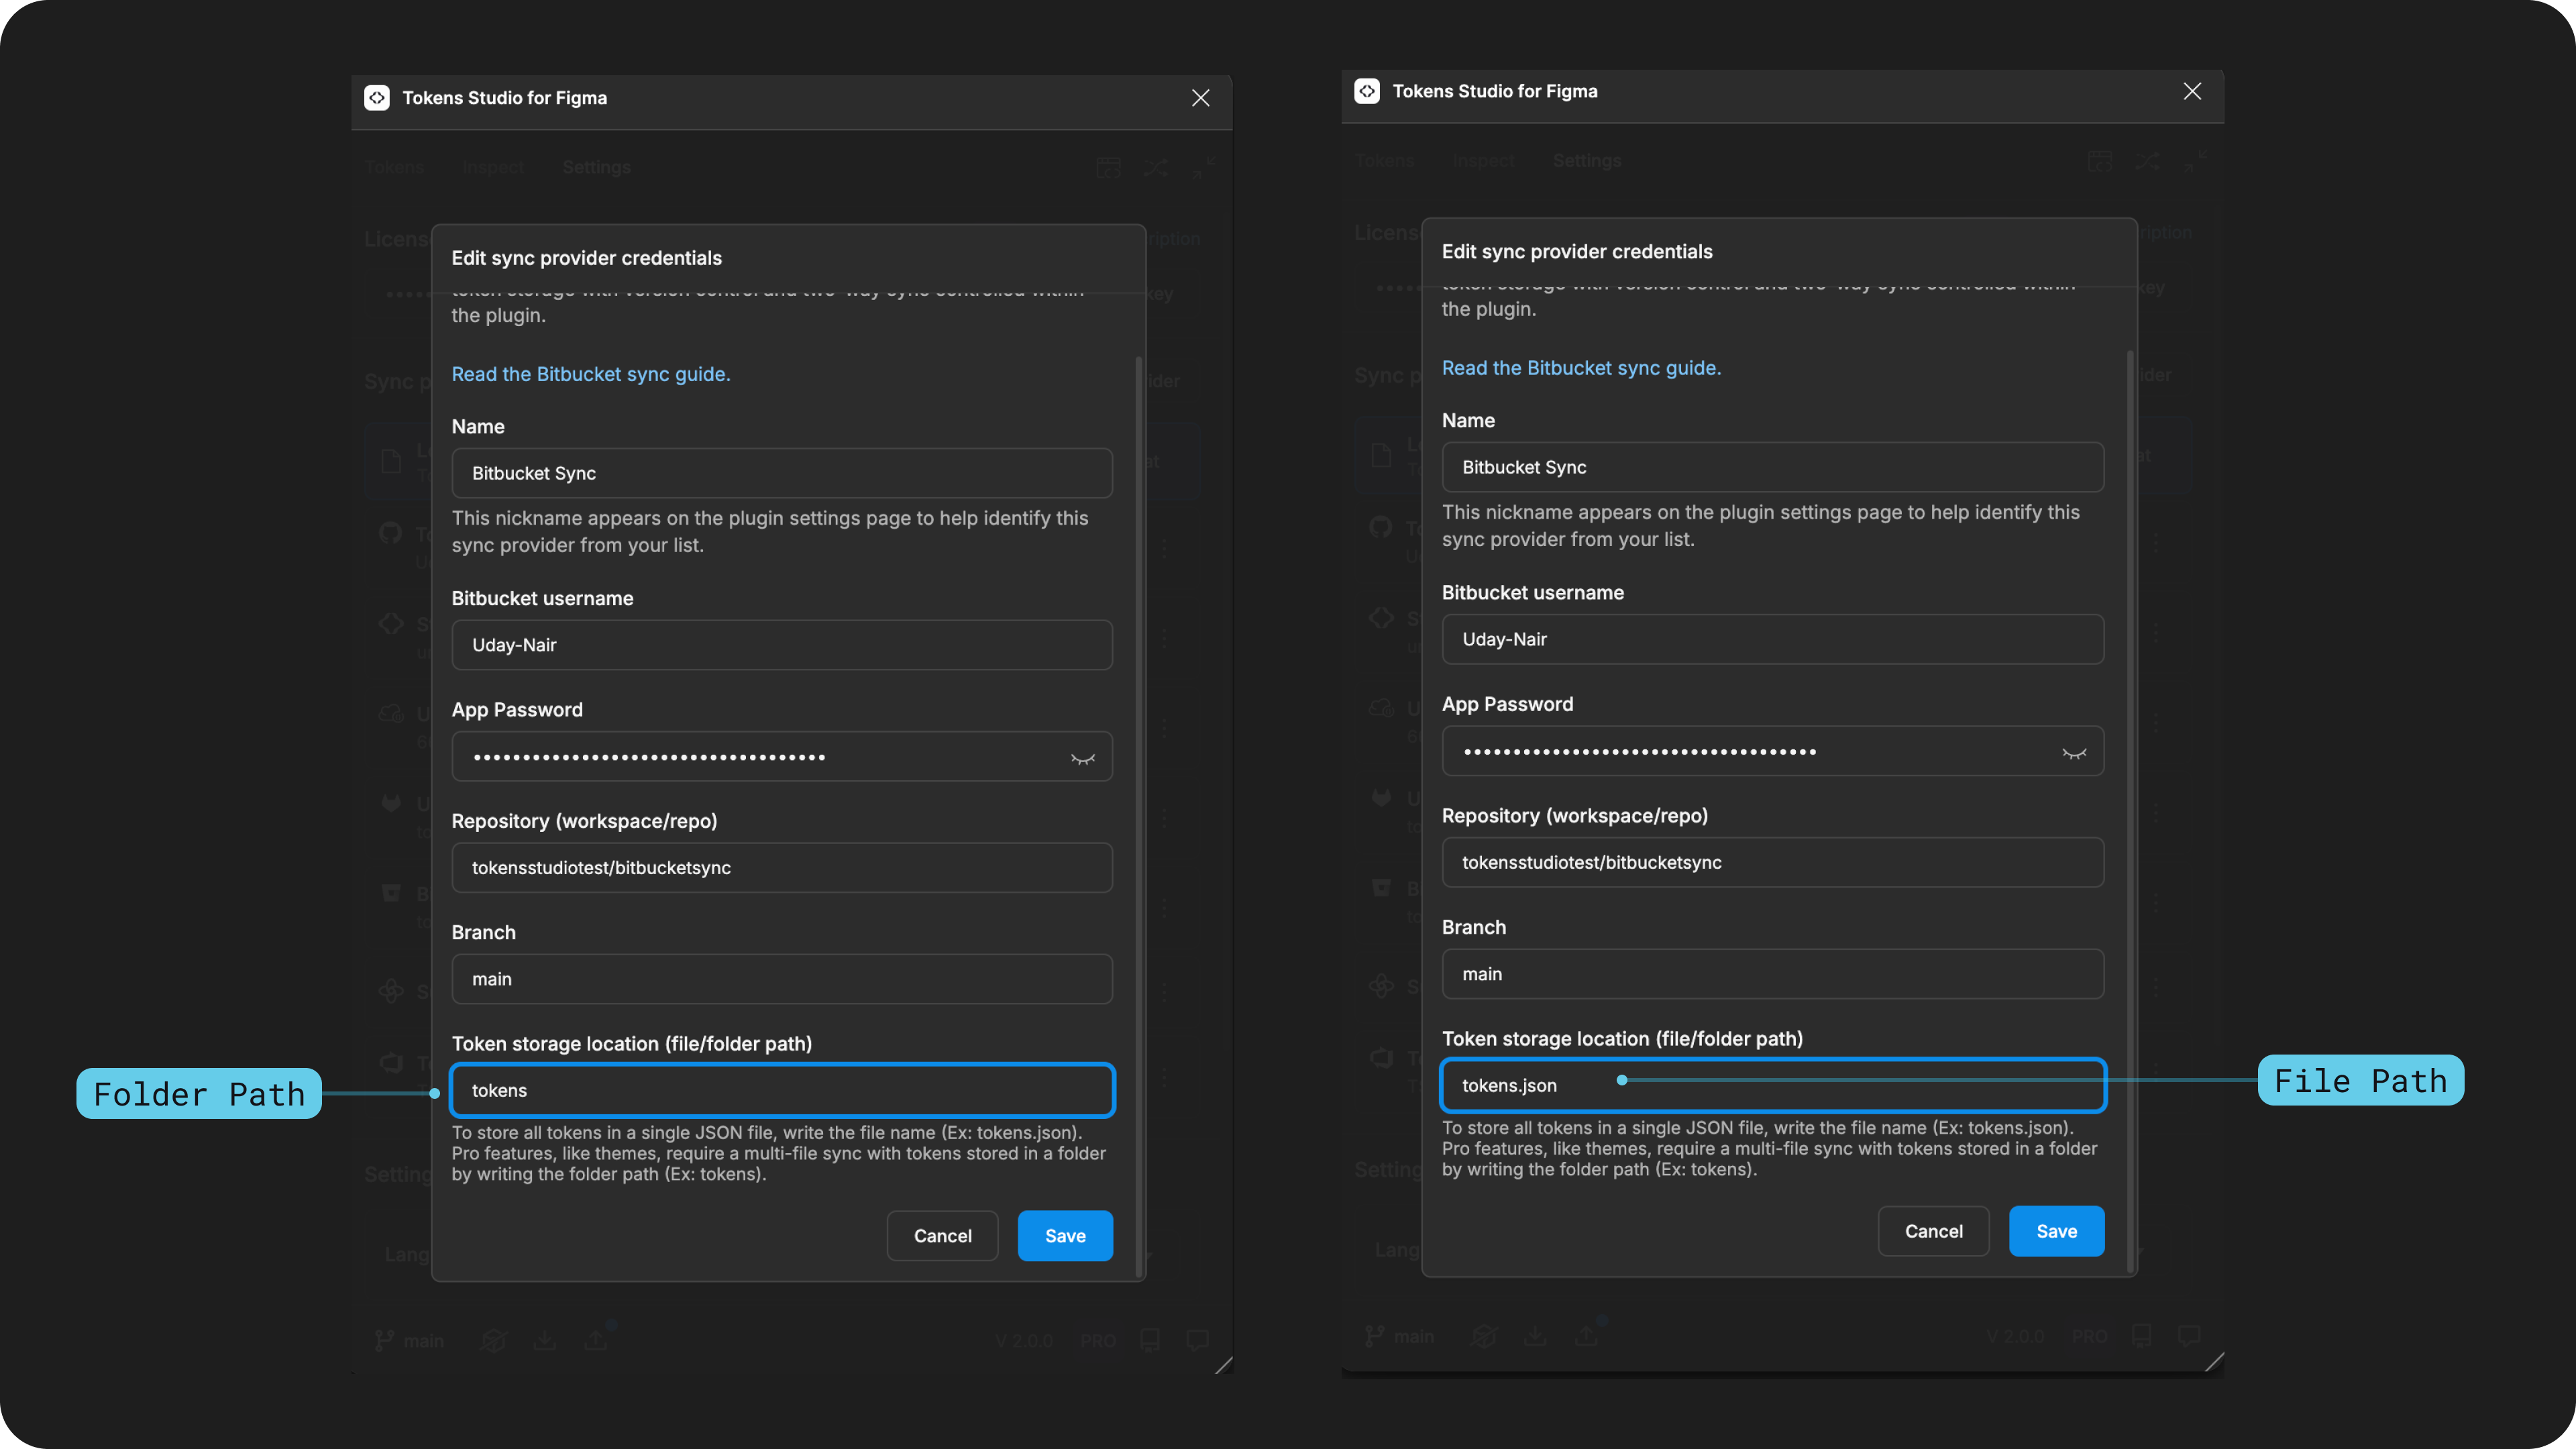
Folder
The folder option syncs Token data from the plugin into a folder that contains multiple JSON files or subfolders of JSON files.
This multi-file sync option requires a Pro Tokens Studio licence.
We suggest setting your Token storage as the folder option when possible. If you use the Theme feature in Tokens Studio and your engineers are consuming your Tokens from Bitbucket, they require Tokens stored in a folder for the transformation process to work properly.
→ Learn about the Themes (pro) feature in Tokens Studio here.
In the plugin, we enter the pathway of the folder where we want our Token data to be stored, which is the folder name without any extensions.
For example:
tokens
Our Bitbucket repository will have a folder called tokens synced to the Tokens Studio plugin in Figma.
- Each Token Set created in the plugin is added to the folder as an individual JSON file.
- Additional data files generated by the plugin are also added to the folder.
- For example,
themesconfiguration.
- For example,
Recall that storing your Token data in a folder (multi-file sync) is a pro feature.
- If other team members are working with your Tokens and do not have a Pro Licence for Tokens Studio, your Tokens will be read-only for them.
File Path
Setting our Token storage as the file option syncs our Token data from the plugin into a single JSON file in code.
Combining Token data into a single file limits engineers' ability to work with Theme information when transforming Design Tokens.
→ Learn about the Themes (pro) feature in Tokens Studio here.
File storage might work for you if:
- You are using the free version of Tokens Studio.
- Engineers are not using your Design Tokens in code.
In the plugin, we enter the pathway of the JSON file where we want our Token sets to be stored, which is the file name with the .json extension.
For example:
tokens.json
Our Bitbucket repository will have a single code file called tokens.json synced to the Tokens Studio plugin in Figma.
- Each Token Set created in the plugin is combined into this single file in our repository.
Save and do the initial sync
Once you Save your credentials, the plugin will compare your Tokens with whats in your repository.
You'll see a modal asking you to push or pull to Bitbucket to 'sync' the plugin data with your repository.
→ Read the Add New Sync Provider guide for more details.
Shared source of truth
As you work in the plugin, push and pull indicators remind you to stay in sync with your Bitbucket repository.
→ Read the Push and Pull to Sync Provider guide for more details.
Once your Token JSON files are synced to your Bitbucket repo, you have a shared source of truth between Designers and Engineers!
Engineers typically transform Tokens used in code with Style Dictionary, which is tool-agnostic. Tokens coming from Tokens Studio require an additional step: @Tokens-studio/sd-transforms, an npm package that prepares Tokens for Style Dictionary.
The various Token Types supported by Tokens Studio have unique transforms to be aware of.
→ Jump to the Token Type overview.
Resources
Mentioned in this doc:
- Bitbucket - https://bitbucket.org/product/
- SD-Transforms - Read Me
- Style Dictionary - https://styledictionary.com/
Community resources:
- None yet!
💡 Something to share? Submit it here!
Known issues and bugs
Tokens Studio Plugin GitHub - Open issues for Sync Bitbucket
🐞 If you are experiencing an issue not listed here, please reach out to us on the Troubleshooting channel of our community Slack, or submit it on our feedback tool.
Requests, roadmap and changelog
- 🧑💻 Sync to external token storage enhancements - Feature Request
- How might we improve the experience of working with sync providers in general?
- ↕️ Git sync enhancements - push, pull, merge, branching - Feature Request
- 🔐 Data security info request - Feature Request
💌 Visit https://feedback.tokens.studio/ to contribute or subscribe to updates.